


Trong Micro Frontends, thực thi Custom Elements + Server Side Includes = 💚 - phần 2


SSI giải cứu Custom Elements trong môi trường SSR
Trong phần 1 mình có nhắc tới dùng Custom Elements trong Micro Frontends.
Trong thời điểm load SSR web, JS không tồn tại, chỉ có HTML,
thay vì dùng JS để tạo ra Custom Elements, ta sẽ dùng SSI:
<blue-buy sku="t_porsche">
  <!--#include virtual="/blue-buy?sku=t_porsche" -->
</blue-buy>
#include comment sẽ được thay thế bằng response từ endpoint: /blue-buy?sku=t_porsche.
Ngoài SSI ra thì ta cũng có các giải pháp thay thế
- Edge_Side_Includes (ESI) có cú pháp:
<esi:include src="http://example.com/1.html" alt="http://bak.example.com/2.html" onerror="continue"/>
ESI kết hợp với nodesi, biến phần dynamic của web hoạt động dựa trên cơ chế Promise.
Compoxure - Proxy middleware dựa trên công nghệ htmlparser2 dành cho phần viết bằng ESI hoặc SSI.
tailor -
pre-rendered markup on the backendcó số star là 1.6k nhiều nhất trong số các tools ở trên.tailorlấy các phần động đồng thời song song với nhau.
Kiến trúc trong tailor tổng quan:
Ảnh lấy từ mosaic9.org:
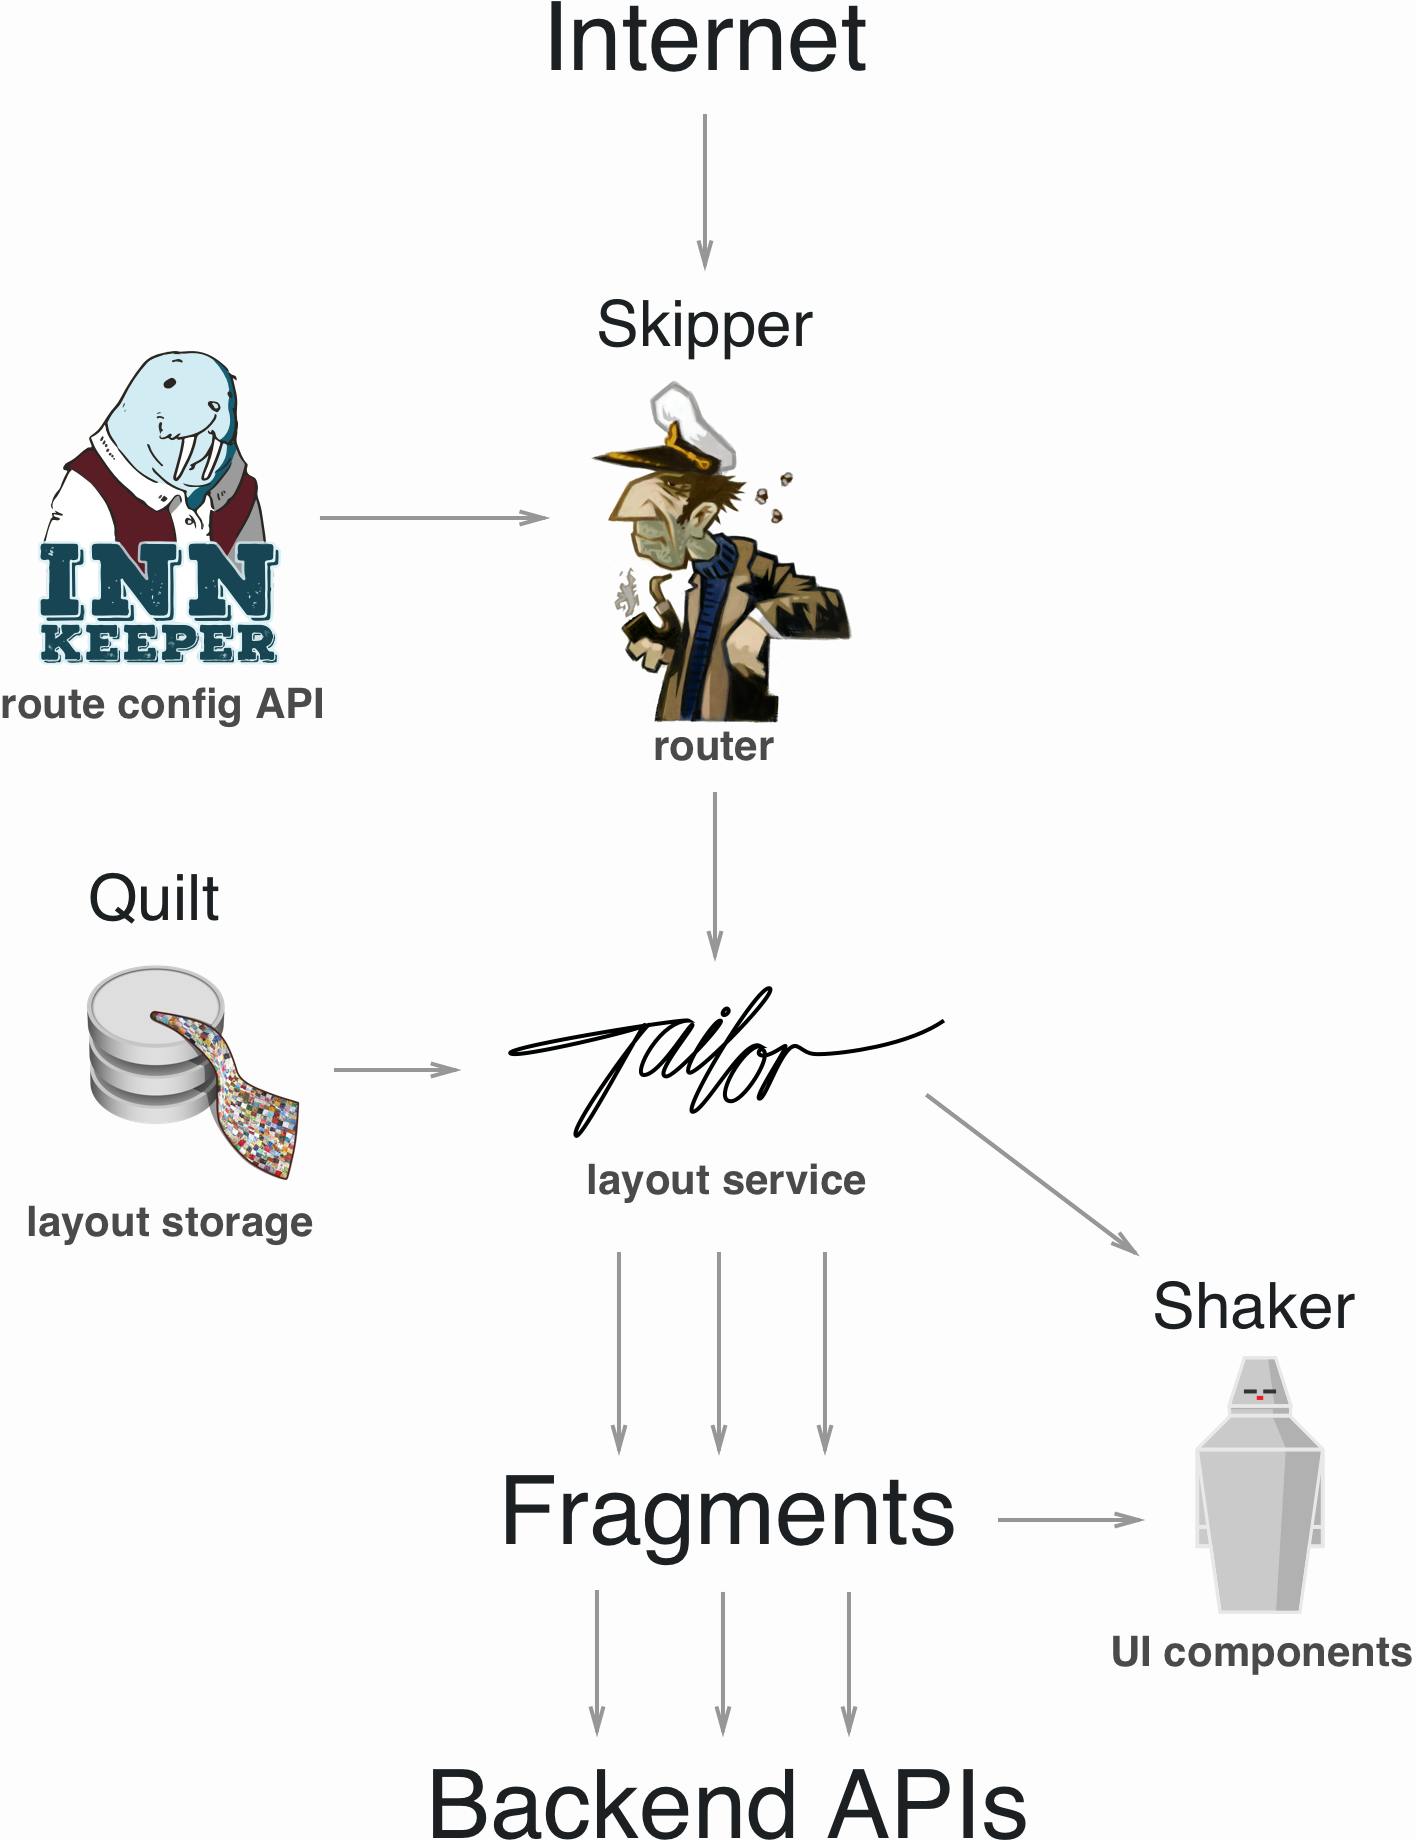
Tailor sử dụng parse5 để dịch template, thay thế fragmentTag thành các luồng bất đồng bộ:
<html>
<head>
    <script type="fragment" src="http://assets.domain.com"></script>
</head>
<body>
    <fragment src="http://header.domain.com"></fragment>
    <fragment src="http://content.domain.com" primary></fragment>
    <fragment src="http://footer.domain.com" async></fragment>
</body>
</html>
Đây là ví dụ của 1 project dùng Tailor + Vue + lerna - không hỗ trợ SSR:
<!doctype html>
<html>
<head>
  <title>Tailor + VueJS Example Application</title>
  <meta name="viewport" content="width=device-width, height=device-height, initial-scale=1.0">
  <link rel="stylesheet" href="./commons/style.css" />
</head>
<body>
  <!-- header -->
  <div id="header">
    <span class="fragment-error">Header failed to load</span>
  </div>
  <fragment src="http://localhost:8091"></fragment>


  <!-- dashboard -->
  <div id="dashboard">
      <span class="fragment-error">Dashboard failed to load</span>
    </div>
  <fragment src="http://localhost:8090" primary></fragment>


  <!-- twitter feed -->
  <div id="dashboard">
      <span class="fragment-error">Twitter feed failed to load</span>
    </div>
  <fragment src="http://localhost:8092" timeout=1000></fragment>

</body>
</html>
- momos và momos#why-you-dont-use-nginx - Được viết bằng Go.
TechLead nên cân nhắc thật kỹ các giải pháp thay thế được SSI, để phù hợp nhất với dự án của mình.
Cụ thể thực hiện SSI bằng nginx
upstream team_blue {
  server team_blue:3001;
}

upstream team_green {
  server team_green:3002;
}

upstream team_red {
  server team_red:3003;
}

server {
  listen 3000;
  ssi on;

  location /blue {
    proxy_pass  http://team_blue;
  }

  location /green {
    proxy_pass  http://team_green;
  }

  location /red {
    proxy_pass  http://team_red;
  }

  location / {
    proxy_pass  http://team_red;
  }

}
Ta để ý khi ssi: on;, các team c, mỗi ông sẽ code dự án của riêng mình tại 3 cổng khác nhau chạy trên con web server này lần lượt là: 3001, 3002, 3003.
Đây là source-code đầy đủ về cách kết hợp giữa nginx + docker-compose + 3 project tách biệt nhau hoàn toàn của team Red, Green, Blue.
Ảnh chụp web khi thay đổi thành phần dựa trên params: `t_fend hoặc t_eicher:
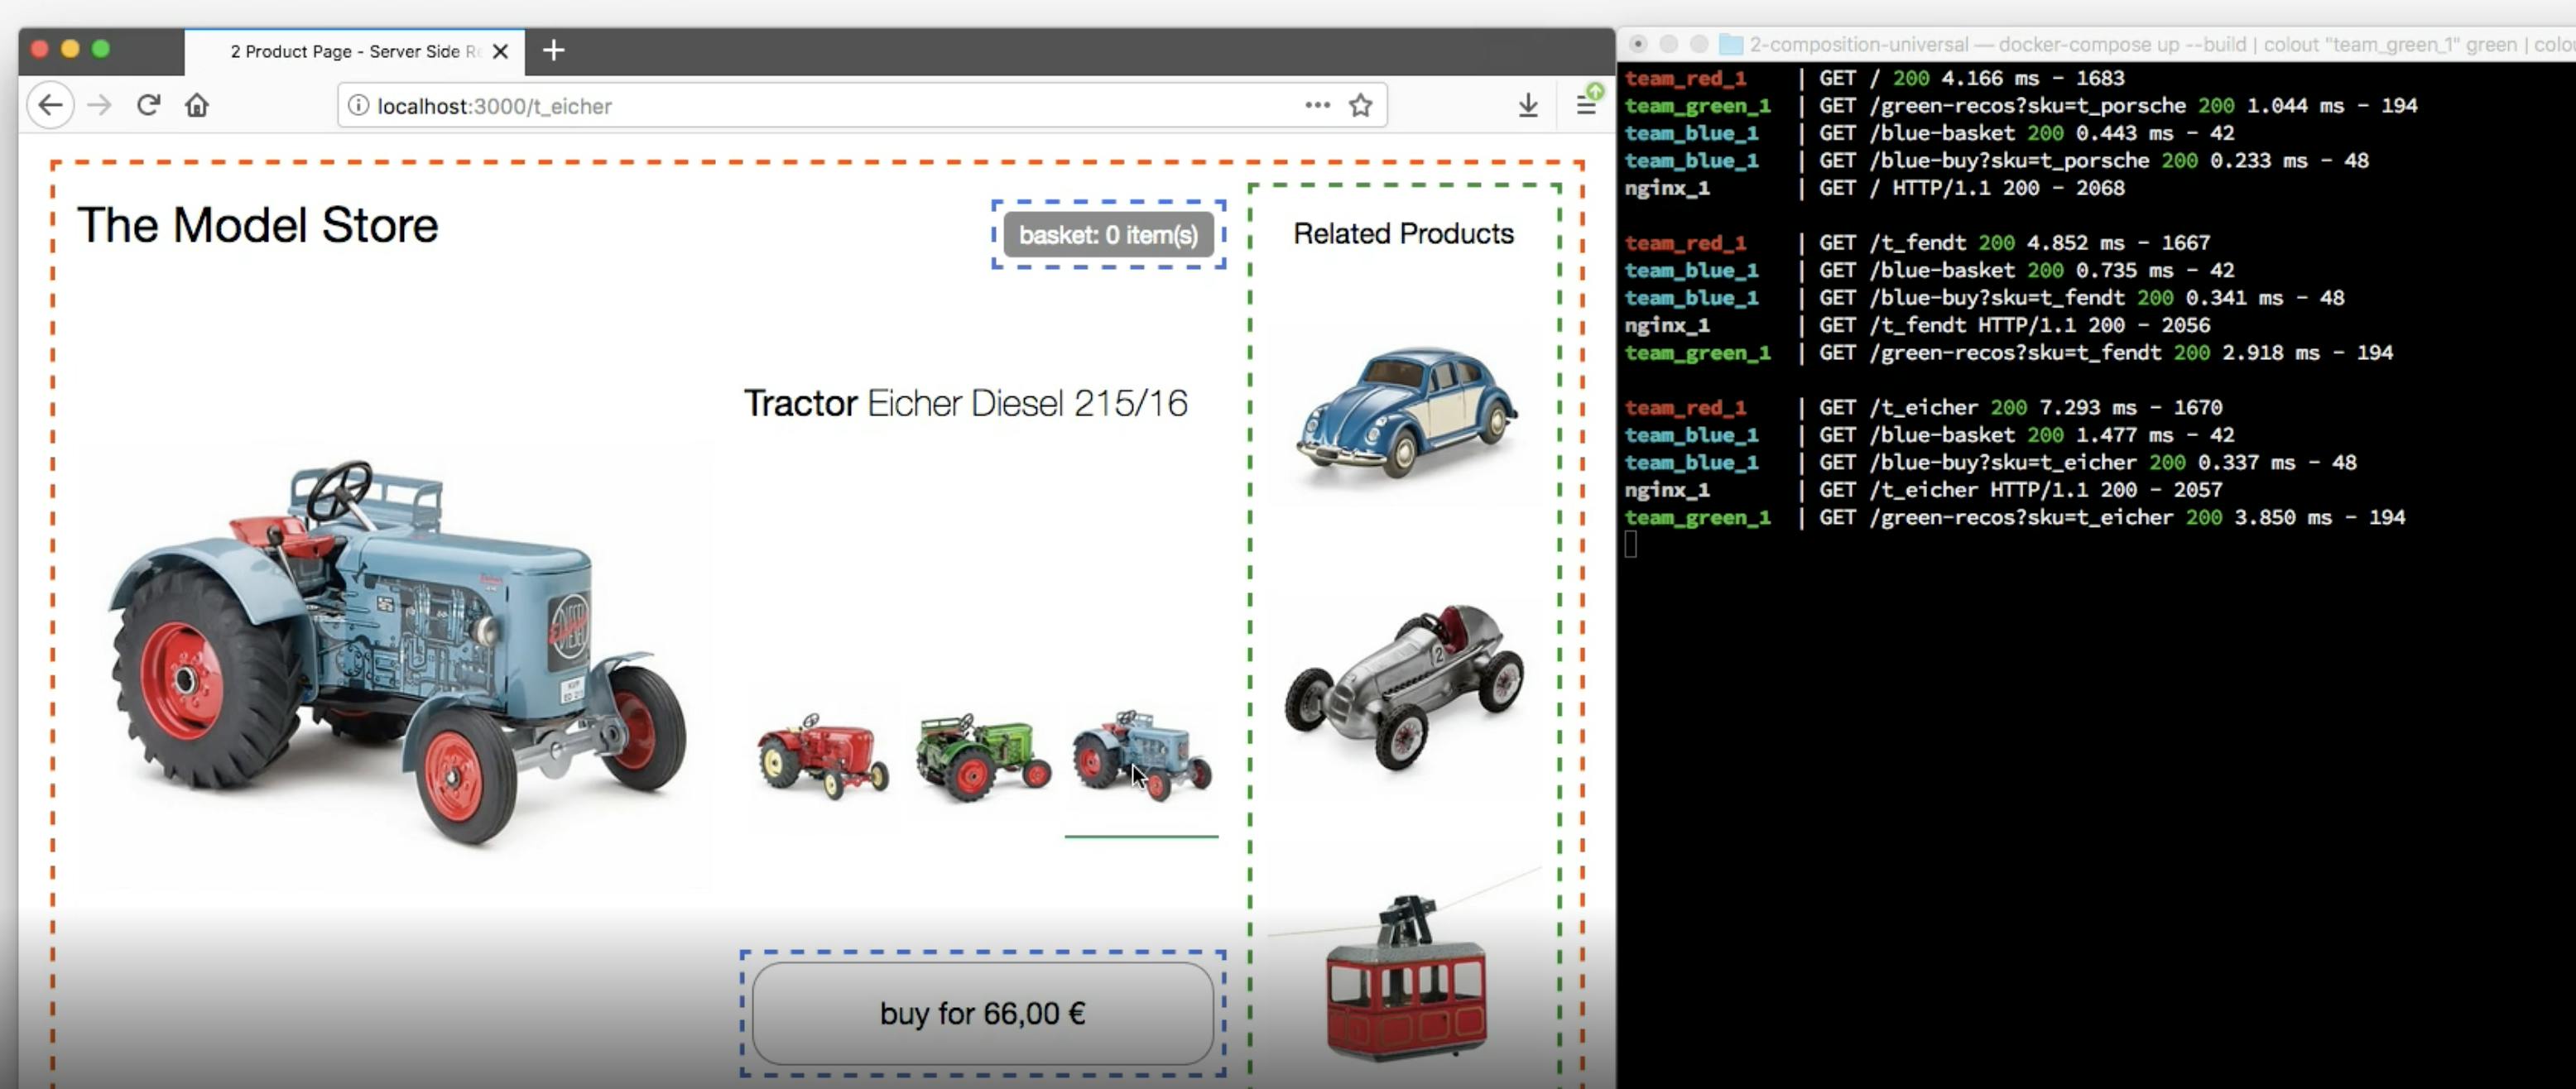
3 nút tương ứng với 3 cái xe Red, Green, Blue mỗi lần bị click sẽ reload lại cả page! Đây không còn là SPA - Single Page Application thân thương nữa rồi!

3 nút đó sẽ route cả page tới từng phần của 1 trong 3 team đã làm.
1 khi JavaScript khả dụng là sau khi SSR web đã load xong phần JS thì phần việc route page tới đâu sẽ là việc của client-side (phần việc của JS). Từ đây, khi bấm vào 1 trong 3 nút trên sẽ không còn reload lại cả trang nữa mà thay vào đó sẽ hoạt động dựa trên Custom Elements + JS. Lý thuyết là vậy, nhưng thực thi như thế nào thì để bài viết khác nhé.

Phần tiếp theo là Data Fetching & Loading States dành cho Custom Elements + SSI/ESI.
Tham khảo
- Apache - How to SSI
- Server Side Includes, the hottest of the web in 1995
- Micro Frontends
- Bonus: cách thực hiện Micro Frontends với Angular - 100 days of Angular
Photo by Visual Stories || Micheile on Unsplash